Saturday, August 10, 2013

Eating Local

Part of the new changes, no more win and fail. I think it makes the titles visually irritating. Anywho...

I seriously have GOT to write more often. I'm going to lose followers, I happen to really like the dozen of you!

On to the business at hand. Farmer's Markets. Holy cow, they're like the mecca of wonderfully priced produce! I have to admit, I kind of thought you went once a year to get awesome peaches or watermelons. That the rest of the stuff you could buy at the store. GOOD GRIEF. Let me just say, I was stupid.

Courtesy of Google Search
Through a couple of twists and turns of life late last year, I have had to learn to be incredibly frugal with our grocery budget. The first things to go? Organic meats, then organic produce, then I just kind of gave up and started letting the kids eat crap. The produce aisle at Aldi looked decent and the prices were better than any of the other chain grocery stores. So I shopped there. Not knocking Aldi, their snack food is super reasonably priced and they support GMO labeling as a company which is kinda big to me. I get most of our staples there.

I just wanted something more, something healthier that I could feel good about feeding the boys. I found a very small local farmer's market in my area. If you live in Antioch or in southeast Nashville, please check out the farmer's market here. It's small but it's growing. Laurel Mountain has AMAZING eggs and pork! Their CSA is super cheap to join. Here's more about Farmer's Market at the Crossings.

I wanted to try the downtown farmer's market because I wanted to can tomatoes this summer. We all loaded up and went weekend before last. I was amazed. We actually had dinner that night made up completely of items from the market. It was probably one of the best meals we've had, EVER.The boys and I went alone this weekend. I spent $40 today and got more food than I will know what to do with! I have blueberries and corn to freeze. I'll probably also chop and freeze some onion to have on hand because I pretty much use onion in everything other than cereal. Here's what all I got:
1 pint of blueberries
2 dozen eggs organic, pastured
1 quart of goat's milk...
1 dozen ears of corn
approx 2 lbs each of apples, tomatoes, potatoes (purple and yukon gold, not just plain bakers!), onions
big bag of kale
2 avocados
3 bulbs of garlic
3 each cucumbers and zucchini.

Holy. Cow. That's a lot of food for CHEAP! Plus, we just helped stimulate our local economy. We're going to be eating foods this week that were grown close to home, that are grown by hardworking farmers, and that were picked when they were ripe, not forced to ripen artificially. Plus, the vendors encourage you to eat right there! The boys walked around eating tomatoes this morning. They were a hit.

If you live near Nashville, follow this link to see what produce is available at what times of the year. You should be able to find one of these charts on any farmer's market website in your area.

Seriously, get up a little early on Saturday morning. Your belly will thank you for it all week!

Tuesday, July 30, 2013

Lavender Essential Oil.... WIN!

A girlfriend, Lishy, started pinning all of this stuff a while back about essential oils. And because I basically re-pin her life and pretend it's my own, I started reading about them. We all know that I am a hippie at heart so these amazing little oils were right up my alley! I started small, making holiday gifts for friends and family.. Sugar scrubs and bath salts. Everyone seemed to like them. I kept ordering more oils because this one is good for scarring and that one is great for migraines.

I have turned into a monster. I love them. My little bottles of magic make me so happy. I'm going to tell you about my all purpose wonder oil, Lavender. It is great for so many things! Headaches, scrapes, cuts, burns, SUN burn, calming, sleep, cleaning... It is my first line attack for pretty much any first aid need. Or emotional need.

How do you use it? Really simple! You put a few drops in a carrier oil-many people use olive oil, coconut oil, almond or grapeseed oil. Really any oil without a strong scent will work. Then you apply it to the area that you want to use it. Headache? Apply it to your temples. Put it right on the injured area in the event of a cut or scrape. If you have a sunburn, put several drops into a spray bottle of aloe vera juice or fractionated coconut oil. Keep it in the fridge, then just spray the area of the burn. You can put it on the soles of your feet or across the back of your neck to help you relax and fall asleep.

courtesy of Google search

Here's the thing... You DO NOT have to spend a ton of money to get quality oils. You don't. There are people out there that will tell you that you must. Simply put, they're lying. It may be a lie born from ignorance of other quality products or a purposeful twisting of the truth. You don't have to spend a fortune to use essential oils.

I purchase my oils from a few websites..Nature's Gift is one, as is Essential Oil Exchange, and I recently purchased from both Mountain Rose Herbs and Plant Therapy!

Nourishing Treasures is a website run by a certified aromatherapist. She and a group of people spend their own money to have a third party test many brands of essential oils, in order to let us all know what companies sell quality oils. Her website is great and full of information!

Do you use any essential oils in your home? If so, which ones and how do you use them?


Sunday, June 30, 2013

Homemade Peach Ice Cream.... WIN!

I have been away far too long. Somehow, even with kids that aren't in school, the summer has gotten crazy! Playdates and parties, chores and an ever needy patio garden, it has just all come to a point where I am so busy every day! So, I apologize for being away so long.

Part of summer fun is farm fresh produce. Not the bland, picked too early, from another country produce at your local grocery store. Its the amazing, you can smell it as you walk up, farmer's market produce. I'm not sure if it's being from the south or being from the family I am, but I love peaches. Love in a way that I wait all year for the couple of weeks of amazing peaches the summer brings. In our family we eat South Carolina peaches. Georgia's are good. A good SC peach though? It's like candy. 

Jonathan is off today so we're having a big family dinner for our little family to celebrate. Roast chicken and sides still to be determined but I am thinking at least roasted potatoes. I should have bought  some greens at the market yesterday, they were beautiful. I forgot though. Oops. 


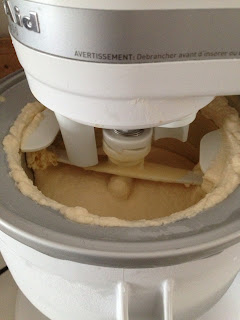
I was going to post this tomorrow, because I didn't plan on taste testing until after dinner. But I did taste test. And I MUST share this with you. Here's the pin for the simplest peach ice cream ever. No cooking! No raw eggs! All you will need an ice cream maker of some kind. We have a Kitchenaid mixer with the ice cream maker attachment. You can put this into a regular ice cream maker or use some of the other pinterest ideas for making it without a maker.

Here is Melissa's recipe from the blog Bless this Mess

3-4 medium peaches, peeled and pitted (I used 6 because I wanted this to be SUPER peachy)
1 cup whole milk
1 cup granulated sugar
pinch salt
1 1/2 cups heavy cream
1 T. vanilla extract
Ice cream in progress
Add the peeled and pitted peaches to a blender or food processor and blend until smooth. In a medium bowl mix the peach puree, milk, sugar, salt, heavy cream, and vanilla extract together until the sugar dissolves. Add the ice cream mixture to your ice cream maker and process according to manufacturer’s directions.
Melissa's Notes:
If the peaches don’t want to blend up try adding part of the milk called for to help things move around. If you like more chunks in your ice cream, blend up 1/2 the peaches and dice the other half. Add the diced peaches to the ice cream just before serving.
If you like a harder ice cream, put the ice cream in a freezer container and cover. Let it freeze for at least 2 hours and then let it sit for 10 minutes on the counter before serving. The ice cream straight out of the maker is just like soft-serve. Out of the freezer it is like store-bought.
Now, my Grandmama's homemade peach ice cream will ALWAYS be the best. Because she's the best and that's just how things go. But this is seriously the best I've had other than hers. I would imagine that you could substitute any other fruit for the peaches. I have some fresh picked blueberries that will be topping this yumminess. It's only because I forgot to put them in that they're not IN it. 

Saturday, June 22, 2013

This Must Change.

My blog is not a platform for my views. I like to try out crafty/cooking/hippie things and share them. What I saw on television last night made me think that perhaps I need to share it. I am sick. I am appalled. I will not keep quiet.

http://openchannel.nbcnews.com/_news/2013/06/21/19062348-disabled-workers-paid-just-pennies-an-hour-and-its-legal?chromedomain=rockcenter&lite

The gist of the story is that while District Management makes in excess of $400,000 yearly, some employees working for Goodwill make as little as .22 an hour. I know some people who are handicapped and I cannot fathom them being forced to work for so little because it is the only job that they can get.

I have donated to Goodwill. I have shopped at Goodwill. Thinking that I was helping people who otherwise wouldn't be employed. Watch this commercial: http://www.youtube.com/watch?v=jLM0EKjhuGs, it makes you think that you are doing amazing things for that man's sense of self worth. Instead, he probably makes little to nothing hanging clothing every day.

Please, I implore you, share this on your blogs, your facebook pages, your groups, everywhere. This must change.

Wednesday, June 5, 2013

Homemade Papusas.... FAIL.

There is this little place tucked into a mostly hispanic neighborhood here in the 'ville that makes the most incredible food.. It's called a papusa. These are wonderful little Salvadorian corn cakes filled with beans and cheese (or other stuff), flattened out and then cooked on a griddle. It is served with a vinegar based slaw and  together, they are my favorite thing in the world to eat.

Out of curiosity one day, I looked them up on Pinterest. If it is possible for a mere mortal to make, they'll be there. And I wasn't disappointed. There weren't an abundance of recipes, but I only needed one, right? Here's the one I found! It sounded REALLY simple. At first I was worried, could the most amazing food on the planet be this easy?? And then I thought about it... It's peasant food, of course it's simple.

I went to work making the most delicious papusas in the history of papusadom. I made refried beans from scratch, grated queso fresco... This, my readers, was going to be the best meal ever. This is what papusas look like...


And this is what mine looked like.....
Nailed it.
I even got Mr. Needlesandpins involved. He's a chef.. which means he can cook ANYTHING... right?
Wrong. The one on the right is his papusa.

So, here's the recipe. I want one, or all, of you to try it. And have success with it. And please, comment and give me your secret.

Papusas:
Recipe from kidworldcitizen.org
2 c Maseca (corn masa flour) *look in Latin American grocers
1 1/4 c warm water
salt
soft, white cheese
oil
Mix the ingredients together, for several minutes. It may look dry, but do not add extra water unless it absolutely will not stick together. Too much water, or too little water will both affect the dough and it will not form a ball properly.
You should be able to roll the masa like playdough into balls. Pat your palms together to flatten the balls into disks, like thick tortillas. If the dough is too sticky, add a tiny bit more of flour; if it is to dry, add a drop more of water.
Fill with cheese (or other fillings, beans, meats, etc)! Put the grated cheese in the middle of the dough, and bring up the sides and pinch close. Re-mold the masa into a fat tortilla again, with the cheese in the middle.
First, heat up a non-stick pan: either a cast iron pan, traditional comal, or a griddle. When it is heated and lightly oiled, cook the pupusas until slightly golden, 4-5 minutes per side.


Friday, May 31, 2013

5 Minute Friday... Imagine

Five Minute Friday The subject for today's 5 minute Friday post is imagine. Here are my 5 minutes.

START

I would have never imagined I would be where I am today. If someone would have told my 21 year old self that I'd be a semi-crunchy mom of two little boys these days I would have laughed at them. I had my life planned, har har. I was going to write or sing or still be waiting tables, perhaps managing. But absolutely NOT a mommy.

I could have never imagined that that the things that would be fulfilling to me are baking bread with the boys or tending our container garden. I couldn't even imagine owning (well, paying on) a home. I could have never imagined meeting a man as wonderful as the one I met and married.

I imagined I would be some sort of dark Dorothy Parker writer.. Or I would have finished college and saved the world.. Or maybe I would have had some dogs.

I am so glad that my life is better than I imagined. More than I ever could have imagined. A more perfect version of anything I could have ever imagined.

I can't even imagine what the future holds. My life has become much smaller in some ways, much larger in others. I love it.

STOP

Saturday, May 25, 2013

Bad Blogger

I'm a bad blogger...

I was going to do the Five Minute Friday post... I was going to blog about my container garden that is starting to produce... And then my Great Aunt, my FAVORITE Great Aunt, had another stroke. So the blogging has fallen to the wayside while I worry. She's a lot to do with the way I am today.

We did manage to hit our local farmer's market this morning and marched against Monsanto today here in Nashville.

I will be back soon. I just haven't felt much like writing the past few days.

I will leave you with an adorable pic of Connor from the march today.

Tuesday, May 21, 2013

iPhone Cord Saver... WIN!

Short post here today, the husband is off from work so there will be lots of chores done today! All manner of yard work to do. We've got our back patio garden rocking along with some decorative plants but the front of the house looks awful. (Post to come about how edible landscaping turned into container gardening!)

Our holly bushes (which I despise) are growing out of control and the lawn looks more like a meadow with all of the weeds growing. We're probably going to have to dig up the yard to get rid of the weeds so for this summer, we're just keeping them trimmed. The bushes will eventually be pulled up and replaced with prettier things that don't reach out and bite you when you walk by. I'm thinking blueberry bushes, hydrangeas, roses... I am hoping to mix edibles with pretty flowers.

So today is a crazy easy solution to a problem I have... The kinked iPhone charger cord. I plug in my phone when I go to bed but generally stay up reading for a while on my Kindle app, resulting in a kinked cord where it meets the plugin on the phone. I don't have a before pic because I never planned to use this as a post but I DO have an after! :)

What you will need... A spring from an old ball point click pen and your iPhone cord.

Twist the spring around the cord until it is all onto the charger cord, think putting a new key on a key ring. I will warn you, there was a bit of cursing involved in getting the first couple of spirals onto the cord. Those little springs are tight. All told, it took me about 2 minutes. When you've got it all twisted around, it should look like this!


Now, you can read your Kindle app or text or Facebook all you want with your phone charging and you don't have to worry about the cord kinking or coming apart! A total WIN!

Friday, May 17, 2013

5 Minute Friday: Song


Five Minute FridayI've decided to do a post a week not about Pinterest or knitting... Unless it comes up in the 5 minute Friday posts.. LOL. It's a big link party each Friday where everyone writes about one word for 5 minutes. No editing, no worries... Just writing. I think it will be fun and allow you all to get to know me better!

Here goes nothing!

Today's word is song. I love music. LOVE music. It has gotten me through hard times, lifted me up when I'm blue, and provided a soundtrack to some wonderful and amazing moments. I wish I could say I have a favorite song. I don't. There are so many songs out there that move me. Some classical, some chick rock, some blues. There is no one song that defines me.

Both boys love music intensely and their favorite songs right now are Adele's "Rumor Has It" and most anything Beatles. It is amazing to watch them already relate their feelings to music and find themselves in particular songs. I would imagine right now it's more the sound and less the words.. They're only 4 and almost 2.

Jonathan and I have a song.. It sounds cheesy but it is Etta James' "At Last". We used to sit in his apartment talking all night and listening to blues, he chose that song for us. It was sweet and kind and true. It made me love him all the more. We have another song, when things aren't great.. Patty Griffin's "When it Don't Come Easy". It is absolutely what brings us even closer together.

Okay, so that was 6 minutes. But now you know a bit more about me! If you want to join in the fun, click either of the links to 5 minute Friday and come play!

Wednesday, May 15, 2013

DIY Eye Cream... WIN!

Do you ever feel like the more you learn, the more you wish you wouldn't have gone out looking for information? I have those feelings about learning to live more naturally lately. I feel like everything I buy is just a horrible, toxin-laden, chemical nightmare. I especially feel this way about skin care products.. And then I see the commercials for Oil of Olay or Clinique and their promises of satiny smooth age spot free skin.. And then I look in the mirror. I'm starting to get crows feet, I have an age spot on my cheek. And I think, how can I possibly reconcile my intense desire to slather my face in toxic sludge just to look like I did when I was 20 with the fact that I am terrified that if I use said product, I may grow gills? Okay, I exaggerate for effect, but you get the point.

Ladies, we all know how it is. First, we notice tiny little lines around our eyes. Then, we raise our arms up for whatever reason and our boobs go back where they belong... And then, KIDS... Stretch marks and sagging skin and dark circles under our eyes... And there seems to be no way to stop it! I will honestly say, I have had the thought, "I am in my 30s, I am happily married, I have had babies... Do I really have to look good? Maybe I'll just give up, I mean I'm past my prime anyhow..." And then some 15 year old boy calls me ma'am at the grocery store and it makes me want to cry. All the poor kid did was have good manners.

So, I am determined to find ways to keep my youthful beauty. Without gill-causing chemicals. I found this on Pinterest... Imagine that! And I am pretty impressed with how it is working for my crow's feet! You're going to have to trust me on this one, I can't get a good pic of the side of my face with my phone.

It is insanely easy! Two ingredients according to the recipe or three if you make it like me!

This is from Ramblings of a Happy Homemaker, as the pic below!

All you need is coconut oil and vitamin E oil. I added a little lavender essential oil because it is good for your skin. I think I am going to use frankincense next time because it is also wonderful for skin!

Before you freak out about all of the OILS I just mentioned, oils are good for your skin. The right oils are even better for your skin. Herehere, and here are some fun links about using oil for better skin health!

Pic from Ramblings of a Happy Homemaker

So, back to business, you find a jar. Any small jar will work, the jar you see here looks like a room service sized jelly jar. I picked up a small baby food sized jar at a craft store. 
Melt your coconut oil, you can let it sit in a warm room, warm it with a double boiler setup, microwave it... Whatever method YOU feel comfortable with. 
Remove from heat if you are using a heat source to liquefy the coconut oil.
Then add your Vitamin E oil. You can either use capsules that you squeeze the gel from or a liquid Vitamin E oil. You just add a little. Maybe about a teaspoon for a 4 ounce jar. 
Stir it until it is completely mixed and add your essential oils if you are including them. Pour into your container. 
**NOTE: if you are using essential oils in your eye cream, make sure you are using a glass jar. EOs can change chemical composition of plastics and leech chemicals into the cream or dissolve the plastic. This does not make them dangerous to skin, we are not made of plastic and good essential oils will be ONLY plant material** 
I like to put it in the fridge to get it to solidify completely and quickly.

It is completely fine to store on your bathroom counter, but do be aware that coconut oil liquefies at 76* so if you live in a warm climate, your cream may become oil. In either state, it is wonderful to use on crows feet and areas of dryness. I use a tiny amount on the tip of my ring finger to make sure that I don't apply too much pressure to the tender skin around my eyes. 

I have a girlfriend that was struggling with eczema patches and she found this blend to be quite effective on them!

Have you tried this? Going to try it? Let me know in the comments!

Tuesday, May 14, 2013

New York Cheesecake...... WIN!!!

You know when you realize two days before Mother's Day that you're short on money and time and have gotten exactly nothing for your mom? That's when you hop on to Pinterest and start looking at things to bake. Like me, my Mom enjoys sweet things so I immediately looked for desserts. And then I was stuck. I know she likes chocolate but chocolate seems overdone sometimes. I know she likes pies but I am not ready to make pies... I'm still a wee cook. And then it hit me.... CHEESECAKE. My Dad refuses to eat cheesecake. I don't get it but it works out because it leaves more for Mom and I. She really doesn't get to eat cheesecake much because only she likes it. So, PERFECT MOTHER'S DAY GIFT!

And then I kind of freaked out.. There are a lot of cheesecake recipes out there. From just cream cheese to incredibly complicated (or so I thought). I tend to be a go big or go home kind of chick so I went for the more complex recipe (Here's the pin!). I was pretty positive I was going to botch it. But, the kind baking gods smiled down on me and a delicious, beautiful cheesecake would be mine.

I will say, the recipe looks more complicated than it really is. It's all about timing and making sure you do not open your oven.

Here it is!
Annie's Eats (annies-eats.com) New York Cheesecake:
Ingredients:
For the crust:
5 tbsp unsalted butter, melted, plus 1 additional tbsp, melted for greasing the pan
4 oz (approx 8 whole) graham crackers, broken into rough pieces and processed into fine, even crumbs (I think I actually used 9 because it was what was in the package)
1 tbsp sugar

For the cheesecake:
2 1/2 lb (5 8oz packages) cream cheese, cut into rough 1 in chunks, at room temperature
1/8 tsp salt
1 1/2 cups sugar
1/3 cup sour cream
2 tsp freshly squeezed lemon juice
2 tsp vanilla extract
2 large egg yolks, plus 6 large eggs, at room temperature

Directions:
To make the crust, adjust an oven rack to the lower-middle position and heat the oven to 325*. Brush the bottom and sides of a 9-inch springform pan with 1/2 tblsp of the melted butter. In a medium bowl combine the graham cracker crumbs, 5 tbsp melted butter, and sugar. Toss with a fork until the crumbs are evenly moistened. Transfer the crumbs to the springform pan and use the bottom of a ramekin to firmly press the crumbs evenly into the pan bottom. Bake until fragrant and beginning to brown around the edges, about 13 minutes. Cool on a wire rack while preparing the filling.

Funny story about the crust.. I don't have a processor big enough to process that many crackers at once. So, I used this fun stress relieving technique, the boys really got a kick out of watching me pound their favorite snack food with a hammer....


Increase the oven temperature to 500*. In the bowl of a stand mixer fitted with the paddle attachment, beat the cream cheese at medium-low speed to break up and soften it slightly, about 1 minute. Scrape the beater and the bottom and sides of the bowl well with a rubber spatula; add the salt and about half of the sugar and beat at same speed until combined, about 1 minute. Scrape the bowl; beat in the remaining sugar until combined, about 1 minute. Scrape the bowl; add the sour cream, lemon juice, and vanilla. Beat at low speed until combined, about 1 minute. Scrape the bowl; add the egg yolks and beat at medium-low speed until thoroughly combined, about 1 minute. Scrape the bowl; add the remaining eggs 2 at a time, beating until thoroughly combined, about 1 minute, scraping the bowl between additions. Make sure you are scraping the bowl after each addition!

Brush the sides of the springform pan with the remaining 1/2 tbsp melted butter. Set the pan on a rimmed baking sheet to catch any spills in case the pan leaks. Pour the filling into the cooled crust and bake 10 minutes, without opening the door, reduce the oven temperature to 200* and continue to bake until the cheesecake reads about 150* on an instant-read thermometer inserted in the center, about 1 1/2 hours. Transfer the cake to a wire rack and let cool until barely warm, 2 1/2 to 3 hours. Run a paring knife between the cake and the springform pan sides. Wrap tightly in plastic wrap and refrigerate until cold, at least 3 hours.

To unmold the cheesecake, remove the sides of the pan. Slide a thin metal spatula between the crust and the bottom of the pan to loosen, then slide the cake onto a serving plate.

At Mom's house, we did macerated strawberries for the topping. Cut up strawberries, sprinkle sugar over the top, put in the refrigerator for a couple of hours and voila! macerated strawberries!

At home, I did hot fudge. Because I am addicted to chocolate. :)

This cheesecake was so wonderful, it was dense but not too rich, it was light but not lacking in flavor. The top didn't crack, which apparently is a problem with homemade cheesecakes... It was perfection! My Mom LOVED it and that's what matters. I think it was as good or better than anything store bought.

Coming up in the next few days will be a few work in progress posts, I will show the afghan I am working on and probably a post on tincturing.

Now, GO! Make cheesecake!

Saturday, May 11, 2013

Mail Center.... WIN!

I have been so incredibly busy this week! It was the boys' last week of Mother's Day Out for the week, Connor decided that napping was for sissies... The husband has been working crazy hours.. Just all in all busy! Oh, and I am still working on Manic Mama's award. My brain has been too scrambled to think up questions to ask the people I pass the award on to.

OH, and I had a dead ear this week, resulting in an unplanned trip to the doctor's office to have my ears irrigated. SOME people said that this was an incredible feeling and that it would just make my day... They were WRONG. Let me tell you, I have this horrible (inherited from my Mom) phobia about water in my ears. I can take an entire shower without getting my ears all full of water. So, when one of my ears stopped up early in the week I just thought it would fix itself like stopped up ears often do. It went on for days, by Thursday evening it was starting to hurt. All I could think was NO ANTIBIOTICS! NO EAR INFECTION! So I went to the doc yesterday. One peep in my ear revealed that it was all clogged with wax. GROSS! So they irrigated them. It was like being waterboarded in my ear. I wanted to cry. I actually frantically facebooked to my best friends that I was pretty sure I was drowning. They totally talked me through it, while probably laughing at me since I could neither see faces or hear voices.. lol.

It was horrific, but I now can hear the grass growing. No infection, thankfully.

Okay, but y'all don't come around to hear about my gross health issues.. So on to the organizational fun times!!! One look at this pin and I swooned. LOOK how organized and beautiful that is! I mean, a huge calendar that you can read, places for mail, and inspirational quotes!? SOLD!

Mine isn't quite as fancy as hers but it's totally functional and makes me oh-so-happy!

Here are the quotes I used:
Be humble, for you are made of earth.
Be noble, for you are made of stars.

The way we talk to our children becomes their inner voice.

Be kind, for everyone you meet is fighting a hard battle.

I bought the picture frames at the dollar store, and picked up scrapbook paper to print on. The possibilities are endless! These just struck a chord with me. :)

I then added a really cool magnetic dry erase calendar, I found super cute dry erase markers that are attached to magnets so I can hang them ON the calendar. Joy of joys! No lost markers! Directly under the calender I put a row of hooks for our keys. The plan was so that the keys would dangle into the mail tray, keeping them away from little fingers. Parker shows that our plan was not perfect. Kitchen chairs make a whole world of things possible for kids.
I picked up a simple black hanging file holder from Target to complete the mail center. It was so easy to do! Now everyone knows where their keys are, what is going on for the month, and can find that bill that needs to be paid! And each time I look up at the quotes, it inspires me to work a little harder on being awesome that day. I would say that altogether I spent about $25 on the whole thing. The calendar was most expensive at $16.99 but I had a 40% off coupon for Joann so I only paid half price for it!


Pardon the gigantic fingerprint on the picture, I didn't see that until just now! :/

Couponers, have you heard of Snip Snap? It's an app for iPhone (maybe for others too but I'm not sure). It allows you to search a database of coupons. All you do is search for it, "snip it", and it is saved on your phone. Then when you check out, just present your phone with the coupon bar code to the cashier. It is so great and there's coupons for everything on it! Joann is my favorite place to use it, because you can use more than one coupon so long as the barcode is different!

There you have it! A cute, organized place for your mail and plans! Do you have a central location for things or are they all scattered about?

Wednesday, May 1, 2013

Soft Sugar Cookies....WIN!

Let me start by saying, I have a horrible sweet tooth. I could consume nothing but cookies and cake and pastries and chocolate and candy... But I am insanely picky about sugar cookies. Insane. They have to be soft. If I wanted a cracker, I'd eat a cracker. They have to be sweet but not overly so. I don't care for frosting on my sugar cookies (or my pop-tarts, one of my processed food vices). I want the perfect sugar cookie. And I found it. First try, folks. It's gotta be a record.

Parker had been pestering asking me to make cookies for days. I hate baking cookies. I hate chilling and then rolling dough. It never works for me. I don't know how many batches of cookie dough I have flung into the trashcan, flinging profanity right along with it. I love baking cakes and biscuits, just not cookies. I searched until I found the least labor intensive cookie recipe I could find... This one, by Robin at addapinch.com saved my life. I could totally make these! The total time to make them?? Seventeen minutes. Seventeen minutes?? It takes me longer than that to get Connor dressed in the morning!!

Let's do this!! You can have cookies made before lunchtime!

A couple of notes... The recipe is for a cookie cake but she does include cook times for cookies. I made my cookies too big the first try so they were huge and floppy, so pardon the funny picture. Next batch will be smaller and prettier. :)

Frosted Soft Sugar Cookies:
See? My cookies are huge! Next time, they'll be smaller.

Ingredients:
1 cup butter, softened
1 1/2 cups granulated sugar
2 eggs, room temperature
1 tablespoons vanilla
3 cups all purpose flour
3 1/2 teaspoons baking powder
1 teaspoon baking soda
1/2 teaspoon salt

Instructions:
Cream together butter and sugar until fluffy, about 3 minutes. Add eggs one at a time and combine well. Increase speed of mixer after both eggs have been incorporated. Add in vanilla.

In a large bowl, mix together dry ingredients through salt with a whisk. Using the paddle attachment of mixer, gradually incorporate dry ingredients into butter mixture until all has been combined.

To make cookies, preheat oven to 400*.

Scoop one tablespoon of cookie dough onto cookie sheet lined with parchment paper.

Gently press with palm of your hand to flatten.

Bake for 7-8 minutes being careful not to over bake.

We may or may not have gobbled them all down within 24 hours... They are that dang good.

Oh and Manic Mama, I'm getting to your award... I'm trying to think up interesting stuff about myself. LOL.


Saturday, April 27, 2013

Kitchen Essentials Shopping List... WIN!

I never remember to get everything I actually NEED at the grocery store. I'm not a couponer. I generally don't buy things that there are coupons for. I am trying to get closer to making everything from scratch so I don't need processed and packaged foods. If I buy vegetables that aren't fresh, I buy frozen. And not the kind that you "steam in the bag" or that has "cheese-like sauce". Because honestly, those scare me too. Steaming in a plastic bag? Yikes. My girlfriends at Must Love Mommyhood and Manic Mama are the ones who really encouraged me to go "from scratch".. I must say, it's a LOT of work some days but, it's amazing!

I finally came across a complete grocery list! (Thanks E!) You bet your sweet rolls I pinned it, printed, and slapped that puppy on the fridge! Here's the super awesome list on pinterest! And then I realized that I didn't necessarily use everything she uses. So I tweaked it! Also, she has 100 items. I only have 70. I have an herb garden out front so I don't need as many dried herbs as are on her list. You can change up the list however you like!

So, I have this super awesome, concise list of what I need from the grocery... What to do with it??? I'm going to take a little run to the Dollar Store and pick up an inexpensive, lightweight picture frame and some magnets. I'm going to put it on the fridge with a dry erase marker so that every time I realize I'm out of something I can mark it! Brilliant! No more searching through cabinets HOPING I get everything onto the list!

Do you want my super awesome grocery list?? Follow this link to Dropbox and grab your printable!

Edited: I realized my link was broken just today, it's all fixed now! Enjoy your shopping list!

Saturday, April 20, 2013

Work in Progress Weekend!

For some reason this week has been insanely busy. Insanely busy doesn't lend itself to Pinterest projects and knitting. So there's not a particular project I am sharing with you, rather things that are works in progress. And there are several!

I'll start with Pinterest.. I am going to build a mail center in our kitchen. We have SO much paper that comes into our house every day and it all piles up on the kitchen counter. It drives me batty! So this pin is my inspiration. I have the frames and picked up cute scrapbooking paper to put the quotes on. I haven't quite decided which quotes I'm going to use yet. Any ideas? I am on the hunt for something to function as our "mailboxes". I know something awesome is out there, I just haven't found it yet.

Another thing I am working on is a home cleaning schedule. I am WAY too lazy for this one, but if you have boundless energy, try it out! Mine is more centered around zone cleaning. I have realized that I am NOT a graphic designer. At all. I downloaded Gimp and have opened it and closed it about 40 times... No progress on the printable yet. I promise it will happen though.

On to knitting. I joined a knit along in a facebook group this month. It was a shawl project. I hated it. HATED. I just couldn't get the rhythm down, I wasn't crazy about the yarn I bought... It was a disaster. It did, however, lead me to my local yarn store for help. There, I found the most BEAUTIFUL yarn, it's Koigu in shades of teal and seafoam. I bought 5 skeins of it and went home to search for a pattern. I found the Moonshadow pattern on Ravelry.com. Here's the pin for it! I am in love. And by in love, I mean every second I am not doing anything with my hands, I am working on it! The colors are really interesting in this pattern and I really feel like it's going to be a stunning piece when it's finished.

My other knitting project is coming along nicely, its a super simple "baby blanket" that I am knitting larger for a nice throw blanket for our living room. Love this super easy pattern! I'm doing it some really beautiful colors. The red is a Berroco color, the rest are Cascade 220 colors. It's my in between project. It is pretty big and I don't want to get bored with it.


So, that's what's going on around here.. Lots of work in progress, not a lot done. I just didn't want to leave my new followers, or my old ones, hanging!!

Happy knitting and crafting!

Tuesday, April 16, 2013

S'mores Dip....WIN!

I had so much fun reading new blogs from the Ultimate Blog Party '13, hosted by 5minutesformom.com! I gained some new followers, HELLO!!

I know in my introduction I talked about wanting to eat healthier... But sometimes you just need something sweet. A lot of times I need something sweet. So I found this recipe on Pinterest. I just happened to have all of the ingredients so I went for it...

Bakeaholic mama is the mastermind behind this dip.. I altered her recipe just a bit because I had less patience than her. Also, there are no measurements because I did a ramekin sized portion but this could easily be made for a party!

Here is your S'mores Dip recipe:
Ingredients:
Milk or Dark Chocolate chips
Marshmallows
Graham Crackers

Instructions:
Preheat broiler to 350*
Melt your chocolate chips and pour into an oven safe dish.
Top with marshmallows.
Place on top rack of oven and remove when marshmallows are golden brown.
Break up graham crackers and serve on side.


As you can see, I went to TOWN on this dip. I am SO glad I made a small portion. Because I would have eaten all of it. ALL of it. I wanted to lick the bowl. But I didn't.... Or so I will let you think.

What are your go to sweet tooth satisfiers?

Saturday, April 6, 2013

Topsy Turvy Planter... WIN!

Good morning, lovelies! Is everyone enjoying the blog party?? I know I am having a blast and meeting so many really awesome bloggers!  This is my second post of the party, if you want to read my first post, just click here!


Ultimate Blog Party 2013
It has FINALLY begun to warm up in these parts.. It has been the longest winter ever here in Nashville. I'm used to tee shirts and flip flops at least a couple of times in February but not this year! 
Yesterday was our prettiest day to date so the huz and I took the opportunity to get started on some of our edible landscaping! You can check out all of my pins here. I really want to grow as much of our food as I 1. logically can and 2. our homeowner's association will allow. Everything I am reading about GMOs and pesticides really bothers me. This is the food we eat. The nourishment we give our bodies. It needs to be good for us. Aaand, off my soapbox.
We love fresh herbs in our house. Our spice cabinet is really bare for a foodie house. Why? Because we use mostly fresh. And that can get expensive.. I spend between $2-$3 for a packet of basil every time I make spaghetti or lasagna. So I started researching growing my own. It seems really simple, put them in something cute, water them, and voila! herbs! If you are in the middle Tennessee area and are looking for a good nursery, Needham's Nursery in Mt. Juliet is awesome! 
Here is how I designed our herb garden, they put a  bird bath on top, I did not. We bought a LOT of herbs.
Items needed:
Pardon the mess.. haha
5 ft piece of rebar
1 large terra cotta planter
3 smaller terra cotta planters
1 even smaller terra cotta planter
Potting mix
Items to be planted, can be flowers or herbs.

Instructions:
Drive one end of the rebar into the ground far enough that it will stand on its own.
Take largest pot and put onto the rebar through the drainage hole. Fill with potting mix and plant matter. In that one I put a couple of strawberry plants and some violas for color. Make sure you leave one side of this planter empty so you can stack the next planter on it!
Take one of the 3 smaller pots and run it down the rebar through the drainage hole. Lean one side of the pot into your large pot, you can do left side or right side. Fill your pot with potting mix and plants. 
It isn't as important to leave a whole half of the pot empty to stack the next pots, just leave a little bit of room on the side closest the rebar.
Continue to do this with the rest of your pots, alternating sides to give it the topsy turvy look. When you've run out of pots, you're all done! 
Water your plant babies and watch them grow!

P and C wanted to plant some stuff too!
If you look reeeeeeally closely at the pic above, you can see my DIY herb markers in the pots. That post will be coming up soon. :)
These are the boys, LOVING the dirt. I am hoping to instill in these two kiddos a love of home grown food. I want to get out of the grocery store and into the garden!

Do you grow any of your own food? Leave me a message in the comments below!


Friday, April 5, 2013

Blog Par-tay!

Ultimate Blog Party 2013


I'm still a wee blogger trying to get my blog out into the world so I decided to join a blog party! Actually, my bestie at Mustlovemommyhood told me I had to do this. I wasn't all that hard to convince, its not like she was standing over me with a whip or anything...

Sooooo, what do we do all day around here? I love to knit. Love it. It saved me from post-partum depression. I'm not the best knitter ever and I am pretty sure that I spend more time frogging projects than knitting. Frogging is done when you realize that you have screwed up your pattern so badly that you have to go pour yourself a glass of wine and start ripping out stitches row by row. It doesn't work if you don't drink wine. Or so they told me at the yarn store. They're professionals, who am I to question?

When I'm not knitting, I am surfing Pinterest. Truthfully, I would like to be wealthy enough to pay someone to do all the fancy schmancy pins I find. But as glamorous as being married to a chef sounds, it's pretty much like being married to anyone who is gone from the time the kids get up until the time they go to bed. And they don't get paid crap tons of money like Bobby Flay. So, I kinda hafta do the stuff myself.

I'm learning to live a more natural life these days. I have my girlfriends E and Lishy to thank for that. And the Pinterest addiction. I make all of my own cleaners, use essential oils and herbs for all kinds of fun stuff, and I have just recently learned to bake my own bread! I really am loving living my hippie life! I'm going to be planting some culinary and medicinal herbs soon... Keep your peepers peeled for those posts!

I should probably talk a bit about my roommates too, huh? The huz is, like I mentioned above, a chef. He's awesome. Funny, smart, and totally supportive of all of my hair brained hippie ideas. He told me when we first met he likes his women like he likes his coffee, hot and bitter. Um, SOLD! We have two little monsters ahem, darlings. Parker is 4. He's sweet and smarter than I'll ever be. And then there's Connor. At 20 months he is making it known that it's his way or no way. He is also fascinated with my knitting needles. A kid after my own heart.


That's me! I hope you hang around for all the fun! Most of my posts are Pinterest finds and will have WIN or FAIL in the title. There will be everything from cleaners to gardening to beauty ideas.

See you soon!

Monday, April 1, 2013

Essential Oil Insomnia Blend

**This blog post has been edited because in my essential oil research, I have learned about proper dilutions of essential to carrier oils. You can actually get more benefit from using a proper dilution than from making one incredibly strong.**

I'm going off the beaten path today because this is one of the most important things I use in my home. I have made it for friends and they swear by it. It isn't a pin on my Pinterest page because for some reason, I can't pin from this website. I wish I could because I really think that it would be one of the top pins EVER on Pinterest.

Almost no one that I know gets enough deep, quality sleep. For the longest, I was among those people. No longer.Without taking ANY prescription sleep aids, I am sleeping longer and better. And so is Connor. Those of you who know me in person know that Connor was a HORRIBLE sleeper. Awful. I spent many days in tears because I was so darn exhausted. As a last ditch effort I tried essential oils. I thought they were a cool idea and that they could be good for cleaning but I wasn't that into them. This blend changed our lives.

Here is the link to the article I used to create the blend. It was exceptionally easy and with the exception of the chamomile oil, all of the essential oils are really reasonably priced. Eden's Garden has really great quality oils that won't kill your bank account. Plus, they donate 10% of their profits to a different cause each month. I love that.

Now that you are all kinds of excited about the prospect of great sleep....


Insomnia Blend:
5 drops of Roman Chamomile Essential Oil
2 drops Clary Sage Essential Oil
2 drops Bergamot Essential Oil

Mix all EO's in a carrier oil (grapeseed, jojoba, olive, coconut, etc) and apply to base and nape of neck and temples before bedtime. I use about 3 drops between Connor and myself.
This recipe will make 30 mL or 6 teaspoons of insomnia oil. The dilution is 1% because we use it pretty regularly. If you plan on using it occasionally, you'll have the option to increase the dilution to up to 5%. Here is a fantastic chart explaining dilution: Nourishing Treasures is a website run by a certified aromatherapist, she's awesome!

Store in a dark glass bottle for best results. Nature's Gift is an amazing source for essential oils as is Essential Oil Exchange. They are my two favorites for oils. Bottles can be found on Amazon or on Specialty Bottle's website.

If you don't care for the scent of chamomile, you can cut down on the amount of it in the recipe. I made up a batch with 5 drops of chamomile and added 5 drops of lavender in place of the rest of the chamomile. The scent was much milder and less medicinal. I know the AromaWeb site suggests not using that much lavender but I love the scent and it really helps me with relaxation. It worked just as well as the original recipe for us!

Do you have any essential oil blends for sleep? Or have you tried my blend and loved it? Let's chat about it!

Friday, March 29, 2013

Rosebud's Butter Topped White Bread... WIN!

I am no chef. Which is kind of funny because I am married to a chef. Actually, until recently, I couldn't cook at all. Motherhood has brought out the Martha Stewart in me though. Add to that a couple of girlfriends who cook completely from scratch to both save money and keep ahead of their kid's dietary needs, and you have the "now" me. The one who cooks and cleans and loves all things crunchy. All that said, I have been terrified of attempting to make bread. That has been the one thing I have been absolutely avoiding. I DO NOT want to bake my own bread. It involves something called kneading... wha??? And then you "punch" it?? Okay, the punching part sounded fun but all the other stuff scared the crap out of me.

No bread baking around here, right? Well, then I went on a roadtrip with my most favorite ladies in the world. And I had from scratch bread at Lishy's house. And I decided come hell or high water, I was making some homemade bread. Lishy was kind enough to share her recipe. And then I had the bad manners to go and lose it. So I improvised and found this pin on Pinterest. This was seriously THE EASIEST thing ever!!! You mix up some stuff. Let it sit. Beat the bejesus out of it. Let it sit some more. Then you bake it! And here I thought it involved hours of kneading by hand, covered up to the elbows in flour, children starving while I spend days trying to create the perfect dough... You get the picture.. No fun. I could have not been more wrong!

Here it is! The recipe for the awesomest, easiest bread ever!

Rosebud's Butter Topped White Bread:
Fresh out of the oven!


Ingredients:

4 and 1/2 teaspoons dry active yeast (or the equivalent of two packets)
3/4 cup warm water
1/4 cup granulated sugar
1 tablespoon salt
3 tablespoons unsalted butter, room temperature and cut into pieces
2 and 2/3 cup additional warm water
9-10 cups all-purpose flour (I used half unbleached and half whole wheat flours)
4 tablespoons (1/2 stick) unsalted butter, melted, for brushing the tops of the loaves
Additional butter/cooking spray, for greasing your rising bowl and loaf pans

Instructions
1. In the bowl of your standing mixer fitted with the paddle attachment, dissolve the yeast in 3/4 cup of warm water, about 5 minutes.
2. Add the sugar, salt, butter, additional 2 and 2/3 cup warm water, and mix gently to combine.
3.  Slowly add 5 cups of the flour, mixing on low speed until smooth.
4. With the mixer on its lowest speed , slowly add the remaining flour until the dough is smooth.
5. Switch to your dough hook attachment and knead the dough for 10 minutes. ***Now, if you have a smaller mixer, I would recommend kneading the dough in two portions so as not to burn your motor out-this is a lot of dough.  Alternatively, like my grandmother used to do, you can knead all of the dough by hand.
6.  While the dough is kneading, lightly grease a large bowl with butter or cooking spray, as well as two loaf pans (I used 9″).
7.  Once the dough is ready, place the dough in the greased bowl and turn over to completely coat the dough with butter/cooking spray.  Cover, and set in a warm place to rise for 1 hour.
8. After an hour, punch down the dough (yes!) and divide it into two portions.
9. Working with one portion at a time, roll (with a rolling pin) the dough out into roughly 12″ x 12″ squares, making sure that the thickness of the dough is uniform throughout.
10.  Slowly and tightly roll up each square, sealing the edges firmly.
11.  Tuck the ends of the roll tightly under the bread and place into your prepared loaf pans.  Repeat with the second loaf.  Cover the loaves, set in a warm place, and let rise until doubled, about another hour.
12.  Place one rack on the lowest position in the oven and preheat the oven to 425 degrees.
OMGosh yummy!
13. Bake the loaves for 15 minutes, then cover each loaf with aluminum foil to prevent the tops from browning too much.
14.  Once covered with foil, bake for an additional 15 minutes.
15. Remove the loaves from the oven, place on a wire rack to cool, and lightly brush the loaves with the melted butter.


Wednesday, March 27, 2013

Homemade Laundry Detergent.... WIN! And Other Laundry Secrets

This was my very first attempt at going natural. I knew I wanted to cut down the amount of chemicals in our house and laundry was something I was worried about the most. Our clothes touch us ALL DAY... Unless you are my children, then they touch you until about 5 pm. I, apparently, am raising strippers. We'll get to that later.

With the help of my lovely Lishy, I set out to make my own laundry detergent. I thought it was going to be INCREDIBLY difficult. Until I found Wellnessmama.com. She is my hippie mom guru. Here is the pin to her homemade laundry detergent. It is seriously so easy to make I wondered why I spent all that time and money on Tide. And this stuff takes the stains out of most everything.. I wish I had a before picture of Connor's high chair cover. Let me paint you a picture, 18 month old with a serious love of blueberries and a serious ability to squish and mash all of the ones he didn't consume. Yuck. I really thought the high chair cover was a lost cause, until I threw it in with my new laundry detergent. It came out as clean as the day I bought the chair. This detergent gets out spaghetti sauce too!

Thanks clker!


You'll need:
Borax
Washing Soda (bought or made yourself... post to come)
Bar Soap, Dr. Bronners, Fels Naptha, or any other castille soap
Baking Soda (optional)

This step is my least favorite... Grate your bar soap. You can use a hand grater or a food processor. Either way, it needs to be pretty fine so that it will mix well with your other ingredients and dissolve completely in the washer.
Next, mix 2 parts Borax, 2 parts Washing Soda, 1 part Bar Soap and your Baking Soda, I use about 4-5 tablespoons. I do mine in a big plastic container, think cereal container, so that I can just shake it up. You can also mix it in a bowl and transfer to a container. Whatever works best for you!

courtesy of heinzvinegar.com
I use about 1/4 cup for each load of laundry.

This idea isn't really big enough for it's own post so I'll share it here.. White vinegar works just as well as Downy to soften clothes. I put it in the fabric softener cup in my washer and let it go! Your clothes come out soft and DON'T smell anything like vinegar!


Courtesy of buddhabunz.com
Want to get rid of your Bounce dryer sheets? I have an incredible idea for that too! Buddha Bunz has the most amazing dryer balls! They are 100% wool, natural and safe. They shorten drying time, soften clothes, and cut down on static. I have had my set for over 4 years and they still work like new! You can order them scented, colored, custom designed... Also, they don't release any kind of chemical or waxes like dryer sheets do, thereby cutting down the risk of your dryer catching fire. A must have in any natural home!

Monday, March 25, 2013

Vinegar Fruit Rinse....WIN!

My, it has been a long time since I posted last! All sorts of exciting things happening in the King household.. I took my first ever "girls weekend" with some of my closest friends... My internet girlfriends! I always laughed to myself when I saw other Facebook friends meeting up in real life... AND THEN, I met the girls through an online mommy group. Through drama and life the four of us stuck together. So E and I drove out and  celebrated Tiff's 30th birthday in Oklahoma City last weekend, we also drove out to the middle of nowhere Texas (seriously, I think that was the name of the city....lol) to see our lovely Lishy!

Okay, okay, now to the serious stuff...

I hate the crap that can potentially be on my produce. If you ask E, just short of Armageddon exists on the outside of your fruit. After finding this out, I freaked. I need to clean my fruit before I eat it with more than water!!! I found this pin for an all natural produce soak. I know there are products like Fit Fruit and Vegetable wash exist, I wanted something cheaper and more natural. Here are the ingredients of Fit:
Purified Water, Oleic Acid (from Vegetable Sources), Glycerol (from Vegetable Sources), Ethyl Alcohol (from Corn), Potassium Hydrate (from Basic Minerals), Baking Soda (from Basic Minerals), Citric Acid (from Cornstarch & Molasses), and Distilled Grapefruit Oil.
All of these sound natural, I don't think I believe it though.

Pic from www.cernhc.org


Enter the Vinegar Fruit Rinse:
(The pin above is from Jo-Anna at www.aprettylifeinthesuburbs.com.)
Clean your sink, those suckers can be dir-tay!
Fill your clean sink halfway with lukewarm water.
Add about a cup of white vinegar.
Soak your yucky produce for 10 minutes. I swish it around every so often to make sure all of the sides get a fair shot at the vinegar.
Rinse your fruit and veggies and store as normal!

I like to reuse my berry containers and orange bags. I just wash them in plain blue Dawn to get all of the yuckies out and let them dry while the fruit is soaking.

All of the nastiness from the surface of your produce will be in the vinegar water. It looks pretty gross when you take out your fruits and veggies! I PROMISE, you will not be able to taste vinegar on your veggies. There is enough in the water to clean the produce but not enough to change the flavor of your goodies!


Tuesday, March 5, 2013

Chemical Free Oven Cleaner... WIN!

If anyone had told me that you could clean an oven without dangerous chemicals I would have laughed at them. And then I turned into the hippie mom I am and I became determined to find a way. Here's where Pinterest is again the most wonderful website IN THE WORLD.

Enter, this pin. I didn't believe it... I mean yes, vinegar and baking soda clean my counters just fine. The stuff isn't baked onto my counter tops though... My counter tops haven't baked more pizzas than Papa Johns... I was fully prepared to write another fail post. Until I tried it...

This is exceptionally embarassing. I haven't cleaned my oven in, um, ahem, a while. We'll leave it at that.
Here's what you do:
First, scrape out the chunks of burned pizza goodness or whatever might or might not be in the bottom of your oven... Mine was, as you can see, free of nasty bits of charred dinner. Haha.

Take a spray bottle and fill it with vinegar and water. I would assume you could use straight vinegar, but the original blog said to use a mixture. I did a ratio of 2:1 vinegar to water.

Spray your vinegar water all over your oh so yucky oven.

Then take a box of baking soda and sprinkle it liberally over the moistened oven nastiness. Like so:

Immediately, it will begin to bubble and fizz. This is good. This is what keeps you from having to scrub for six days to get all that garbage out. You can see that I used A LOT of baking soda and vinegar. The less scrubbing, the better for me. Because I don't like cleaning.

Leave this to do it's magic while you wash dishes, watch Days of Our Lives, or knit.. I'll leave it up to you all to figure out which ones of these I did and which ones I didn't. You can leave it for 10 minutes or almost an hour.

Right before I started cleaning, I sprayed and sprinkled again. This was in hopes of having to do even less scrubbing.

I then took a bit of steel wool and pretty much just gently rubbed in a circular motion and all of the gunk came off!! Don't believe me? LOOK!

That's me, IN THE REFLECTION of my oven door! Taking a pic of the amazing work that I didn't have to do! I used the steel wool and then just wiped the stuff off with one of my awesome knitted dishcloths. I would say it took less than 15 minutes to do the entire oven.. I still haven't done the racks yet. Had to go get the kiddos from Mother's Day Out. Darn, right?

Does it smell? Sort of, vinegar doesn't have the most pleasant odor. But I didn't feel like I needed a gas mask or a hazmat suit to clean. And it was easy. And cheap.

Go now! Clean your ovens! Report back! 

Saturday, March 2, 2013

Elderberry Syrup... WIN!

Cold and flu season are almost over but this is a GREAT remedy to keep in your fridge all year. It works better than Tamiflu in some studies. See this linkthis one, and this one to learn about the benefits of consuming elderberries. 


Here's a little note: I am NOT a doctor, I DON'T play one on TV, I just like finding holistic and inexpensive ways to treat common illnesses. If you are seriously ill, see a medical professional. 


Okay, back to the fun part... Elderberries are so good for us. Their flowers make wonderful teas and liqueurs. The berries make good wines and syrups. Only use the dark berries, blue or black. The red berries are poisonous if consumed. NEVER eat red berries from elderberry bushes. I buy mine from a local new age shop, the Mystical Heart. You can find them at mountainroseherbs.com or bulkherbstore.com if you're not into new age shops. I've also heard that you can find them on Amazon as well, but I've not ever looked there.


I use Crunchy Betty's recipe (here for her post). I don't mind the taste at all... My mom says it tastes worse than prune juice. The thing is, it gets you healthy without all kinds of goodness knows what chemicals. It treats the illness, not the symptoms. Which is a HUGE win in my book. So, just know it isn't going to taste like Hawaiian Punch. :P


Here we go!


Elderberry-Echinacea Syrup Recipe
1/2 c. dried elderberries (or 1 cup fresh)
2 Tbsp dried echincacea (it’s perfectly fine to open an echinacea tea bag and use that)
1 Tbsp dried ginger root (or 2 Tbsp fresh ginger root)
1-2 cinnamon sticks, broken in half (I used ground, about 1/2 tsp)
1-2 Tbsp dried peppermint (my own addition)
Several dried cloves (also, my own addition.. I think I threw in half a dozen or so)
3 c. distilled water
3/4 c. raw honey

Directions:First, sterilize everything you will be using to make your syrup. This is just good practice since you don't want any little bacteria monsters hanging out in your yummy syrup! Boiling all utensils for about 10 minutes will do the trick!


Now, take everything EXCEPT THE HONEY, DON'T PUT THE HONEY IN THE POT!!!! and dump it in your pot, stir and stir. Get your mixture warmed up to a simmer, just let everything go for about 45 minutes or until the liquid is reduced by half.. Mine didn't take quite 45 minutes, so keep an eye on it. You'll also want to stir occasionally and mash the elderberries against the side of the pot with your spoon to really release their goodness.


While this is going, measure out your honey into a mason jar.


After the liquid is reduced, you'll need to strain it. Use a fine mesh sieve or cheese cloth. Crunchy Betty used her french press, clever girl...  You will end up with a dark brownish-red liquid. It looks kind of like prune juice but it smells divine. Do not drink it yet... I hear it is pretty tart at this stage. I strain my juice right over the top of the jar, into a funnel of course, so that the heat from the juice will melt the honey just enough to mix everything.


Once you've strained your liquid off, stir really well into the honey. You don't want your juice and honey separating!

I let it cool for a while then put my lid on and popped it in the fridge. The whole family loves it! Connor says "peease"  as soon as he saw the jar come out of the fridge this morning!


You can store it in the fridge for up to three months. Ours never lasts that long though. :)


Dosage instructions are as follows: 1 teaspoon daily for prevention in kids, 1 teaspoon every couple of hours for illness. 1 tablespoon daily for adult prevention, 1 teaspoon every 2-3 hours for illness.